A few months ago, I posted a write up on provisioning the Cisco Jabber for iPad client with CUPS/CUCM and another one covering provisioning the client for hosted services like WebEx Connect. I guess the next logical step would have been to discuss provisioning with the VCS+TMS. I'll have to come back to that one. For this blog post, I am going to focus on provisioning the Jabber client with the Cisco VCS Starter Pack Express.
As noted in my blog on Cisco Jabber for iPad Now Has Video, the latest version of Cisco Jabber for iPad
was released on July 11, 2012. This version of Jabber not only adds
video capabilities that leverage the built-in cameras on the iPad2 and
3rd generation iPad, but it also combines call processing, presence, and
IM functionality into a unified client.
The initial release of the Jabber client supported integration with the Cisco Video Communications Server (VCS) and TelePresence Management Suite (TMS) but it did not include support the VCS Starter Pack Express. This oversight has been rectified with VCS version X7.2.1, which was released on November 5, 2012.
With the Jabber for iPad client certain configurations are mutually exclusive, but it is a relatively simple matter to re-provision the client to use different services. So, for example, you can provision CUPS and then back out to provision WebEx Connect. The client won't run both services simultaneously (unless there is something I don't know). Those of us who have been using the Jabber for Mac (not Jabber Video for Mac, which is just Movi) client are probably familiar with this behavior.
The Cisco Jabber for iPad administration guide provides detailed steps for provisioning the client to work with the VCS. However, this guide doesn't cover provisioning with the VCS Starter Pack. Fortunately, the process is pretty straightforward.
Versions
- VCS Starter Pack: X7.2.1
- Cisco Jabber for iPad: 9.1
NOTE: I tested with version 1.0 of the Jabber client. The device will register and is able to send/receive calls. However, I found that with version 1.0 I did not receive the phone book information from the VCS. With 9.1, this was not an issue.
General Considerations for this Solution
There are a couple of issues that are worth noting with the Cisco Jabber for iPad integration with the VCS Starter Pack. These issues also apply to the Jabber client integration with the standard VCS/VCS Express.
Video Bandwidth Limitations
When testing video call setup between my Jabber client and telepresence clients on my VCS, I noticed that call bandwidth to/from the Jabber client was set to 384 kbps. At first I thought I had something misconfigured. I checked all of my bandwidth settings, links/pipes, and zone configurations. Everything was provisioned to allow much more than 384 kbps. Thinking I was clever, I went to the provisioning options in VCS (Applications>Provisioning) and attempted to modify the bandwidth settings.
Well, as is often the case I had to resort to the RTFM method of self-education. I found out, rather quickly, that the Cisco Jabber for iPad bandwidth has been rate limited to 384 kbps. This is stated in the release notes (1.0 and 9.1). The reason, as cited in the release notes, vaguely points to CPU constraints. Of course, now I have to go find another client to test this theory out. I'll follow up on this point in another blog entry.
Presence Limitations
All flavors of the VCS support a Presence feature. However, the Cisco Jabber for iPad client does not support Presence with the VCS. According to the Jabber for iPad data sheet, Presence is only supported with WebEx Connect and the Cisco Unified Presence Server (CUPS).
I could be wrong, and I don't usually like to speculate, but I believe that the Jabber client is using XMPP while the VCS uses SIP/SIMPLE. I'll have to dig a little deeper to verify my assumption.
Provisioning VCS
Adding a New Device Type to the VCS
To add the Cisco Jabber for iPad to the VCS Starter Pack you must upgrade your VCS to version X7.2.1. Once you successfully complete the upgrade, a new device type (Cisco Jabber for iPad) is available for end user provisioning.
Provision Jabber Device for Users
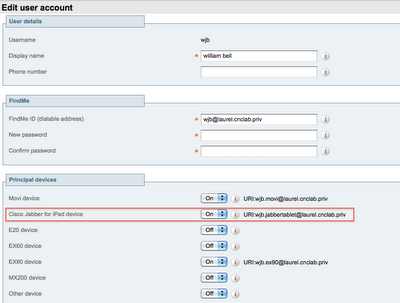
After adding the device type to the VCS we can now associate the device type to end users. Go to Maintenance>Login Accounts>User Accounts. Select a user account from list of users (or search using the appropriate filter). Once you select a user, you will see the new device type under Principle Devices. Toggle the setting option for the Cisco Jabber for iPad device to "Yes" to enable that device. You will notice that the URI is set to userid.jabbertablet@sip-domain-suffix.
You (or the end user, if permitted) can then configure FindMe calling rules. As an administrator, you can do this by selecting the Edit User Options URL under Configure Devices and Locations. In the example below, I have my SIP FindMe alias provisioned to ring my EX90 device first. If that device is busy or does not answer then the call will ring out to my Jabber for iPad and my Movi (aka Jabber for Windows or Mac) clients.
Provision Authentication
The Jabber for iPad client authenticates to the VCS Starter Pack in a manner similar to the desktop (Movi, Jabber for Mac, Jabber for Windows) clients. I have not thoroughly tested authentication and provisioning with this client. The basic zone and authentication configurations provided in the VCS Starter Pack deployment guide works for the Jabber for iPad client.
Configuring the Jabber Client
Loading the Cisco Jabber for iPad application from the AppStore is pretty straightforward. Go to the AppStore on your iPad and search for Cisco Jabber or just Jabber. Let your fingers do the walking. The latest release at the time of this writing is 9.1. I tested the integration with version 1.0 and 9.1.
Note that to use this application, you need the iPad2 or iPad (3rd Generation). You can use WiFi, 3G, and 4G (depending on what your tablet supports). I only tested WiFi communications as I was using iPad2 and I know from previous tests with other softphones that video over 3G is not worth pursuing.
Configuring the Client
We are planning on using the VCS for voice/video call processing and we are using the VCS Starter Pack to provision the client. The first step is to launch the Jabber client. If this is your first time loading the client, or you have navigated back to the account setup screen, you will see the following.
On the left, you can choose Individual Accounts. This option is applicable if you have a Jabber TelePresence Video (i.e. @jabber.com) account or you have a WebEx Connect account. I cover this integration in another installment of this series. It is worth noting that you can also provision a WebEx Connect service as a company-provided account.
For the VCS, you should choose the Select Account option under Company Provided Accounts heading. This will bring up the following screen.
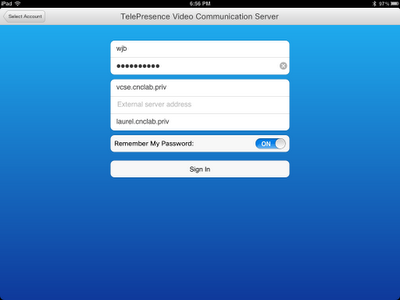
Under Cisco Video and Voice Calling select the option for TelePresence Video Communication Server. Enter in the user name and password associated with your account along with the Internal (and/or External) Server Address and SIP Domain Address. The Internal (or External) server address is the FQDN of the SIP/TLS SRV record provisioned for your VCS. The SIP domain address is the suffix used for device URIs. Once you enter all necessary information, select Sign In.
NOTE: Provisioning the DNS SRV records for VCS registration is not covered here. For the Starter Pack, using the Internal Server setting is perfectly adequate. If you have a VCS Control/VCS Expressway setup, then you may need to specify a different internal and external FQDN.
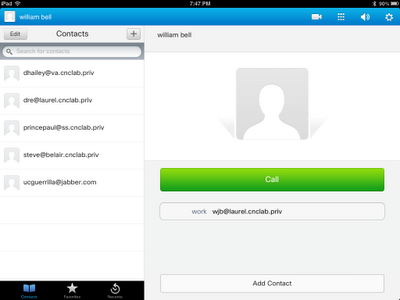
Assuming you have correctly provisioned the user in VCS, you should be signed in and available. Contacts are shown in the sidebar on the left. In the following figure, user william bell is successfully logged into Jabber and you can see a list of private contacts on the left.
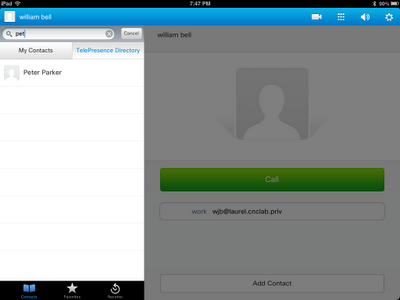
If you touch the Search for contacts bar, you are able to search for contacts in My Contacts or the TelePresence Directory. The TelePresence Directory is essentially the phone book entries that are provisioned on the VCS Starter Pack.
You can dial any URI by using touching the dial pad in the upper right hand corner of the client. Placing and receiving calls operates as one would expect from a Cisco TelePresence client/device. As previously noted, the Presence feature of the VCS is not available to the Jabber Client.
Wrap Up
In this installment, we covered the basic setup and provisioning procedures for the Cisco Jabber for iPad client and the VCS Starter Pack. For basic video calling, this provisioning approach is functional. I wish that Cisco would have allowed for the use of the Presence engine on the VCS as an option for this client. It is certainly feasible that a customer would have the VCS Starter Pack deployed without having WebEx Connect or the CUPS. For those that are curious, the Presence functionality for the standard VCS Control (w/ TMS provisioning) is also not supported with this client.
Thanks for reading. If you have time, post a comment!


Hi Guru,
ReplyDeleteThanks for this valuable post, But in our case we dont have fineMe License so this user option is not be available to us. So in this case how we can configure the Cisco Jabber for IPAD with VCSC and TMS<.